Getting Started
Installation
There are many options to getting GDX into your project; each comes with its benefits and drawbacks.
Unity Package Manager
Installing via the package manager system (UPM) in Unity will provide an immutable (unable to be modified) copy of the package inside of your project.
Tip
There are two available UPM methods. You only need to pick one!
UPM: Package Manager Window
 The simplest and most straight forward method is to use Unity's built in workflow, once you have found and opened the Package Manager window (Window > Package Manager), follow these steps:
- Find the + button in the upper left portion of the Package Manager window, clicking it should reveal a dropdown menu.
- Select Add package from git URL...
- In the presented text field, enter:
https://github.com/dotBunny/GDX.git - After entering the URL, click Add.
UPM: Package Manifest
The above workflow provides a user interface for your project's manifest.json file. Alternatively, you can enter the necessary line into that file manually by opening Packages/manifest.json in a text editor and adding the dependency your self:
{
  "dependencies": {
    "com.dotbunny.gdx": "https://github.com/dotBunny/GDX.git",
  }
}
Note
You can also include branches or releases with this method by appending #branch to the end of the definition. Check out Unity's UPM page for more details.
Asset Store
Note
Discussions to bring the package to the Asset Store are ongoing, we are looking to do this in the near future.
OpenUPM
The GDX package is registered with OpenUPM, and releases are automatically reflected in that registry. The package is registered as com.dotbunny.gdx.
For detailed instructions on how to use the OpenUPM system and it's limitations, please consult their "Installing a UPM package" documentation.
Cloned Repository
It is possible for the repository to be cloned into a sub-folder in your project's Assets folder. This option makes it easy to modify GDX to your liking, as well as access additional in-development branches.
git clone https://github.com/dotBunny/GDX.git
This method is how typical development is done on GDX, however in the dev branch.
Project Settings
Upon installation, GDX should work out of the box.
Further configuration of GDX is done by opening the Project Settings window (Edit > Project Settings...), and selecting the GDX section. You will be presented with a view similar to the image below, with numerous configuration options sorted by feature.
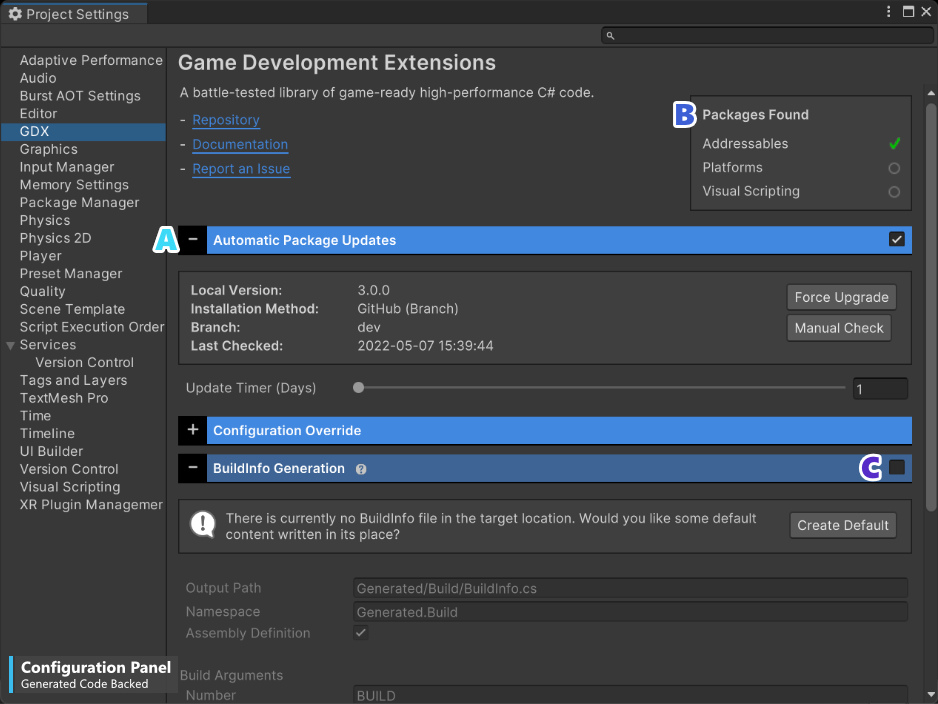
Each feature has a collapsable section (A) that is expandable and collapsable by clicking the +/- buttons to the header's left. Features dynamically activate based on the Unity version and packages found in the project (B).
A section header's background can inform you of the status of the feature. A green background indicates that the feature is active, where a yellow background means that it is currently disabled. Not all features are enabled by default and require an opt-in (C). A blue background indicates an always-on feature, most commonly just functionality that has some level of configuration.
Persitent Storage
Project-specific configuration values are stored in .\Generated\GDX.generated.cs (configurable) using an override pattern which automagically updates the Config when the Core statically initializes.
Note
This process works with DOTS_RUNTIME builds, however there is an additional need to call GDX.Core.InitializeOnMainThread() for thread specific initialization.